Overview
The summer Rage are blessed due to the fact that first and foremost we are a team of team oriented players. Team first! From there, we are blessed with solid talent across the field with some players of exceptional talent. The Rage typically play a 4-5-1 formation. The Rage will build the attack from the back using simple high probability passing. Once within the opportunity zone (area of the field where we can with high probability make a pass to a player who care score) the team will focus on getting the ball to Dallin who will be playing basically as a play making point guard. From there he can look at 1) center attack 2) wing attack or 3) far post cross.
Rage Method of Attacks
Our preferred methods are:
- Center attack
- Wing attack
- Far post cross
- Long counter-attack
- High process
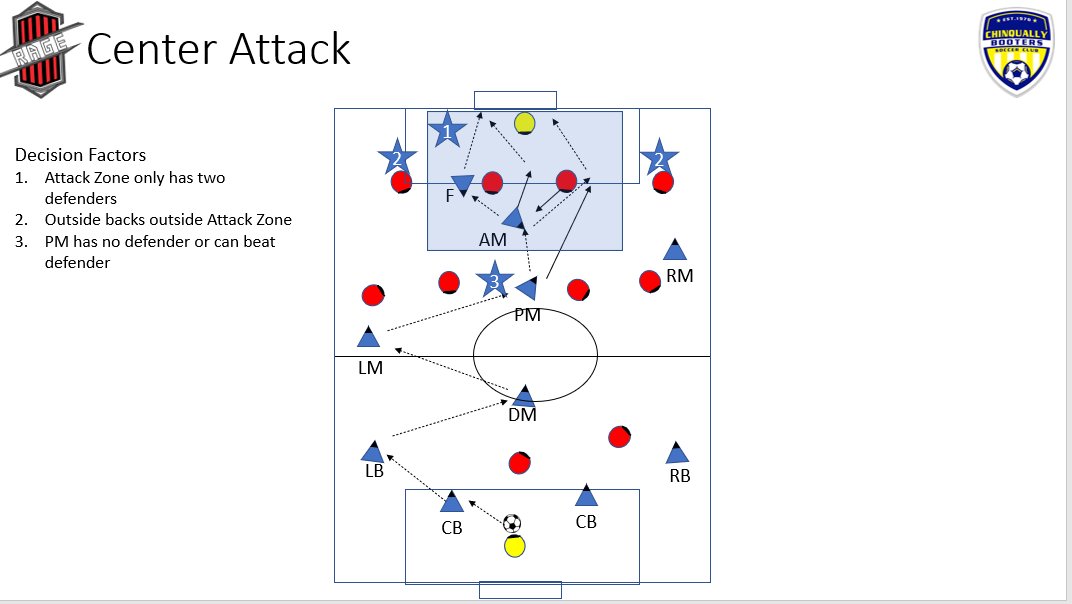
Center Attack
This is our primary method of attack. It comes in two variants. Controlled attack and rapid attack. The majority of the time we will use a controlled attack. When we see that the opponent's defense is in good form and that their center midfield is well positioned we will use a controlled build up using simple passes to move down the field into the opportunity zone. Once there we will look for the play making midfielder. He will receive the ball and key on the positioning of the opponents outside backs and whether he is marked with zero, one or two defenders. If he is marked with zero or one defender AND one of the opposing outside backs is pushed out wide (further than ~10 yards from his closet center back) the PM will create a 3v3/2 situation with the Forward and Attacking Midfielder and using short quick passing will attack straight down the field towards the goal. The Forward will push the defense as far down the field as possible and select the side where the outside back is furthest away and go to the other center back and attempt to freeze him in place or pull him outside. His purpose is to help create a 2v1 situation with the PM and AM against the isolated center back. If the center back marking the forward leaves him to disrupt the PM-AM attack he moves to a free space and receives the ball and shoots.
The other variant of the Center Attack is a rapid counter attack straight down the middle skipping the controlled safe movement of the ball down the field. If the opposing team's center midfield is out of position and the F-AM-PM are in position to make a rapid attack down the field they may attempt this.
Decision Factors:
- Attack Zone only has two field defenders
- Outside backs outside the Attack Zone
- PM is unmarked or can beat his defender(s)
Key Skills
- F pushes defense back
- F fixes a center back out
- OM fix outside backs outside Attack Zone
- F, AM, PM tight passing
- F, AM, PM beat a defender by dribbling
- F, AM, PM near shooting
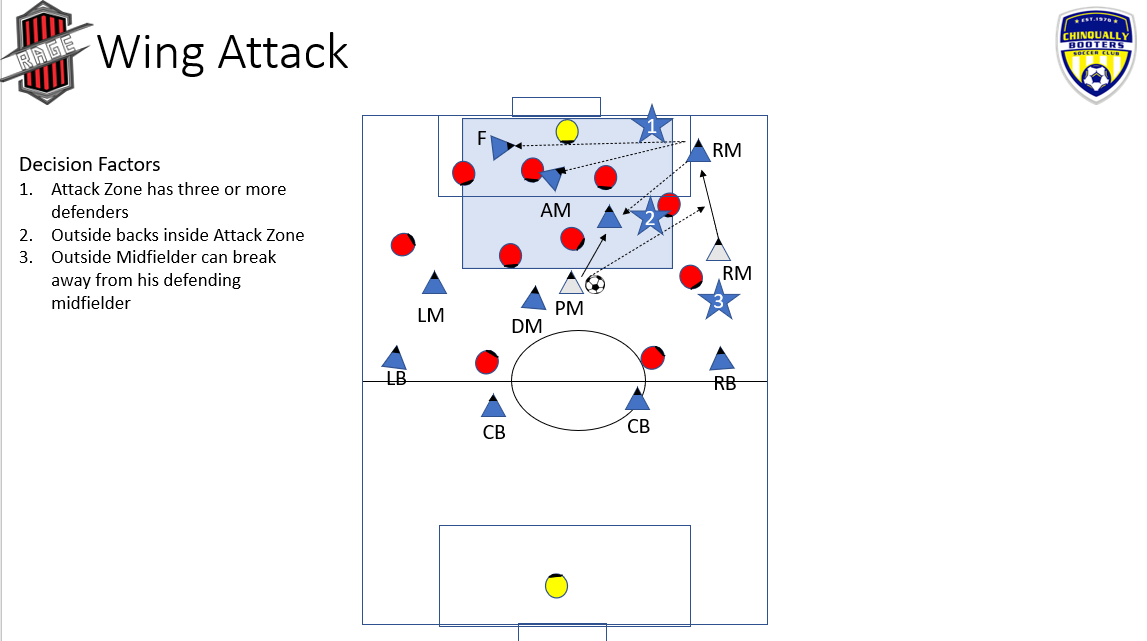
Wing Attack
The Wing Attack has two variants. The controlled build up and the rapid attack. The controlled attack is our primary means of wing attack. In this variant the team has used controlled, simple passing to advance the ball down the field. Primarily we will seek to get the ball to the feet of the Play Making Midfielder. He will look first to center attack and if that is not an option he will look for the wing attack. If the opponent's outside back on the attacking side is pulled tight with the center back in the attack zone he will push the ball out wide into space for the outside midfielder to run onto. From there the outside back will dribble past his defender and the closing outside back and from the end line pass the ball back across the net to the Forward who will be in the vicinity of the far post or the Attacking Midfielder who will be in front of the center of the goal at the six or back the PM who will be 15 yards out from the near post.
The other variant is the rapid attack. In the event that the outside midfielder is unmarked and the F-AM-PM are in position to support his attack, the team will get the ball to the OM who will rapidly dribble down the outside of the field seeking to reach the end line as close to the goal as possible where he will either shoot and or pass to the F-AM-PM.
Decision Factors:
- Attack zone has 3 or more defenders in it.
- Outside back is in the Attack zone or adjacent leaving space outside
- OM can break free from his midfield coverage
Skills:
- PM and OM see open space outside
- PM places a pass into space with just the right speed
- OM times run into space
- OM dribbles and beats defender to the end line
- OM passes with the right speed to F-AM-PM to score
- F-AM-PM time the creation of space to receive ball from OM
- F-AM-PM shoot one touch
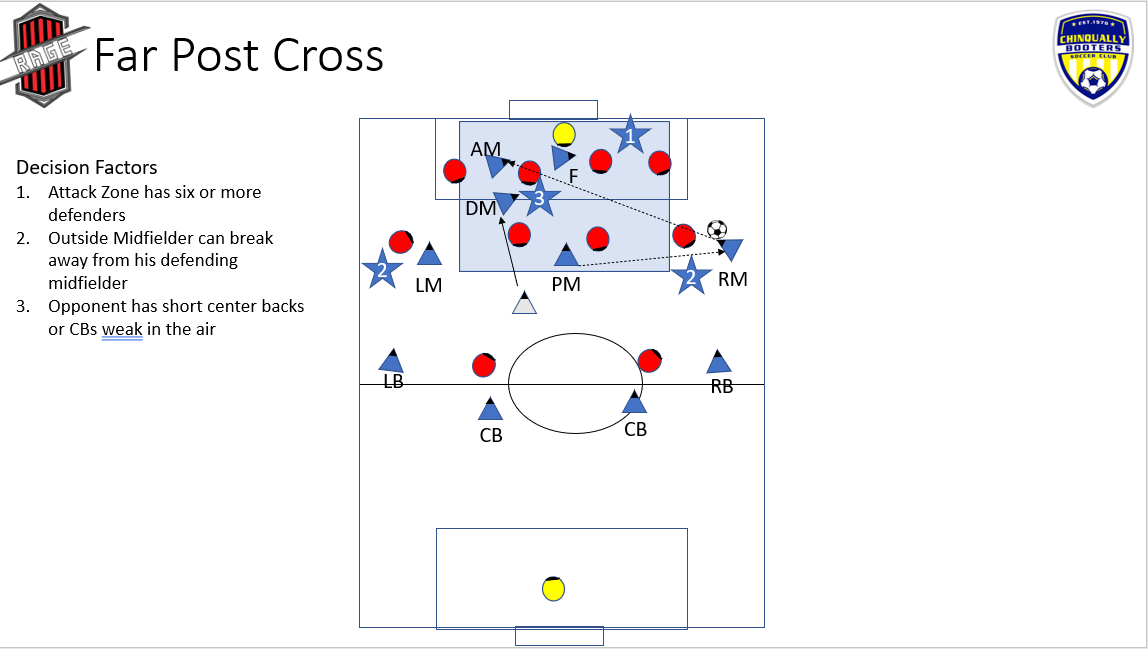
Far Post Cross
If the opponent responds to our Center and Wing Attack by backing up into the Attack Zone in numbers and plays a very compact defense the PM will push the ball outside to either OM and the team will conduct the Far Post Attack. The F will will move close to the goalie to disrupt his ability to get the ball and looking for any rebounds. The AM and DM will move to the far post and position themselves against the weakest defending opponents and the OM will pass the ball into them. The PM and the otherside OM will position themselves just above the 18 in order to rapidly get any ball that comes back out and shoot. The PM and the other side OM will also be prepared to rapidly transition into the defense in the case the other team gets the ball and rapidly counter attacks.
Decisions Factors:
- Opposing team is playing very compact in the Attack Zone and has six or more defenders in the Attack Zone
- OM can break away from his defender and cross the ball
- Opponents have short CBs or CBs who are weak in the air
Key Skills:
- OM accurately pass the ball in the air (cross)
- AM-DM head
- F one touch shot
- OM-PM long range shot
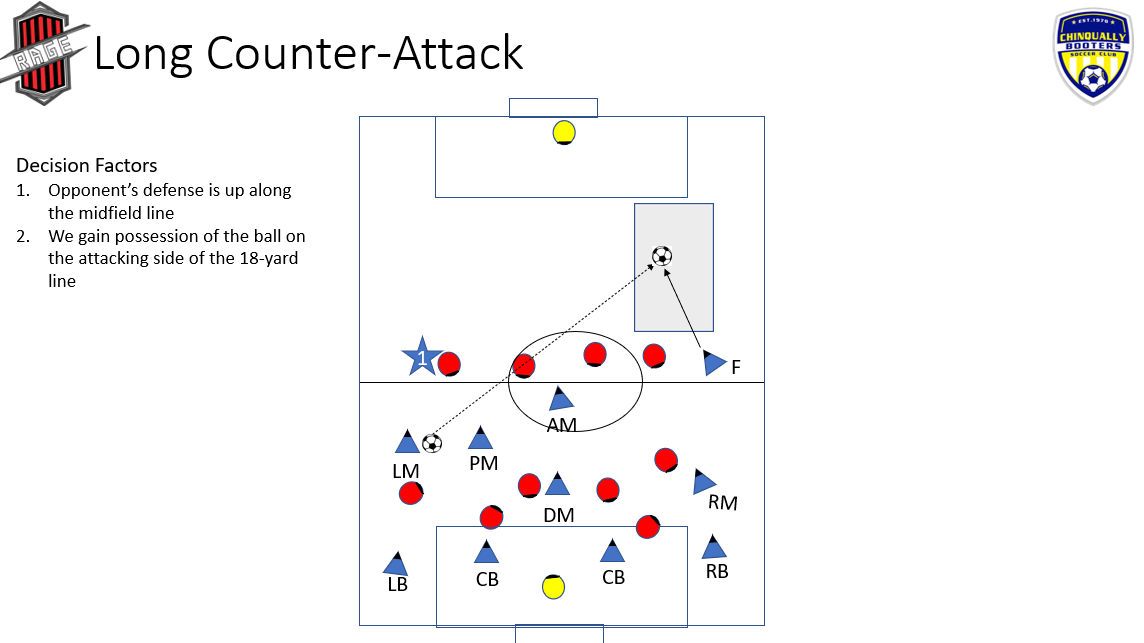
Long Counter-Attack
The long counter-attack is our least frequent method of attack because we are a ball control team. Additionally, we will only play the long counter-attack when Taehoo is playing forward. When we regain position of the ball in our defending half of the field our players will rapidly look up to see if the opponent's defense is still pushed forward along the midfield line and then pass it forward into grey box on the diagram. The forward then attacks rapidly with the AM-PM to score. We will NEVER directly pass the ball towards the opponent's goal. Our long passes ideally will go cross field into the grey box which is off-set from the goal. This will ensure the highest chance of success getting the forward the ball.
Decision Factors:
- Opponent's defense pushed forward along the midfield
- Our forwards postured to make an outside-in attacking run
- Space available to make a long pass
Key Skills
- Player who regains possession of the ball has Game Awareness to see the long counter attack opportunity
- Player who regains possession of the ball can accurately pass the ball with the right speed into the grey box
- Forward in position and anticipates long ball
- Forward has the skill to control the ball and shoot and score
- Off forward able to support the forward with the ball
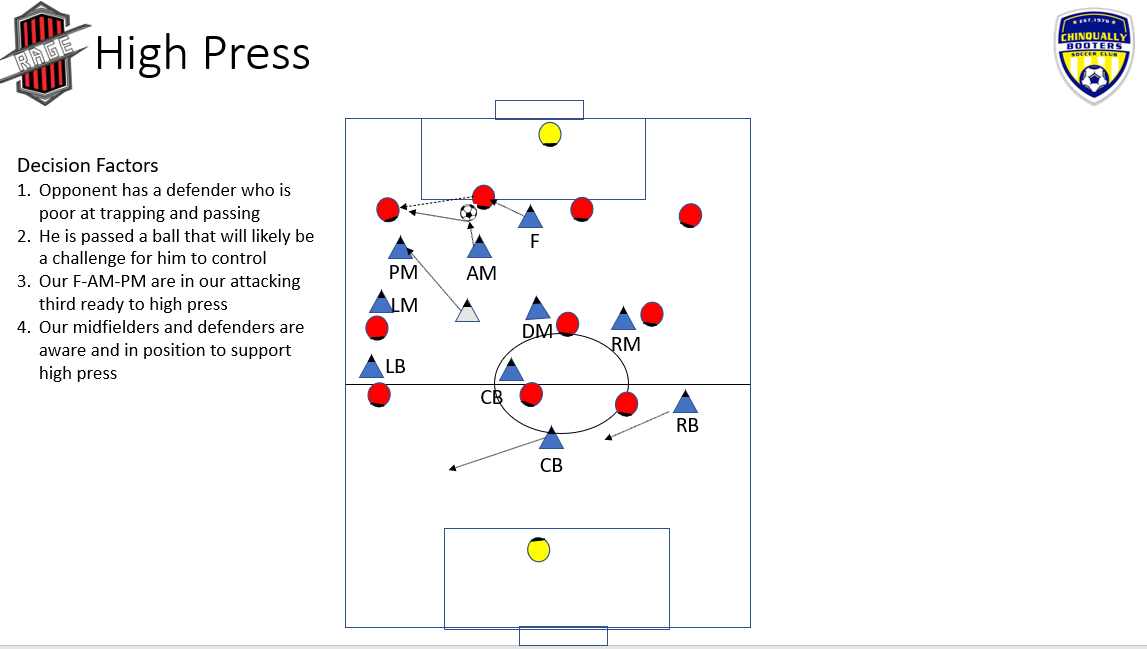
High Press
This method of attack is based on us assessing where in the opponent's defense they have a player or players with weak trapping and or passing skills that we can take advantage of. In this example, we have identified that the opponent's right center back does not trap the ball well. When the center back receives her next pass our right forward rapidly closes on her in a manner to turn her to our left and she yells our "press left". We want to force her to play in a predictable direction that we can control. Our attacking midfielder closes on the center back at the same time as our right forward closing off passing options in the center of the field in order to force the center back to pass to our left. The attacking midfielder is also calling out "press left" so the entire team can support this attack. Our left forward rapidly closes on the opponent's right back anticipating that is where the pass is going. The center back frantically passes outside to her right back while our left forward and attacking midfielder rapidly double team her and gain control of the ball. Where this pass it going from the center back to the right back all of the Rage players step between the player they are marking and the right back who is about to receive the ball. As a team we have now cut off all of her passing options and left her alone double teamed by our left forward and attacking midfielder. The only two Rage players not between their player and the ball are our center back and other side outside back. They drop back to mitigate the threat of the other team passing deep into our defending half. The right forward who started all of this moves to a position that creates the best scoring opportunity anticipating us regaining possession of the ball. Either our left forward or attacking midfielder regain possession of the ball and either rapidly dribble towards the next and score or more likely pass it to the right forward who scores.
Decision Factors:
- Opponent has a defender who is poor at trapping and passing
- He is passed a ball that will likely be a challenge for her to control and play
- Our F-AM-PM are in our attacking third ready to high press
- Our midfielders and defenders are aware and in position to support high press
Key Skills:
- Forward: Game understanding to anticipate where and when a defender will have trouble controlling the ball
- Forward: close on a player and turn them and the ball
- Forward: Game understanding to anticipate an opportunity to steal the ball
- Forward: tackle and gain possession of the ball
- Forward: Dribble, pass, shoot
- Midfielders and Defenders: Game awareness to know that the forwards are hunting
- Midfielders and Defenders: Close off passing opportunities