Preamble
The purpose of this section is to help you install command line tools that you will need to work on our Drupal websites. These tools will include:
- Visual Studio Code: a free text editor and IDE
- Notepad++: another free text editor that is very useful for cleaning up content
- Ubuntu: a Windows command line tool that is very helpful for interacting with websites.
- WSL 2 upgrade for Ubuntu
Text in Bold indicates a command you can copy and paste into your command line.
To copy and paste, copy text normally and then right-click inside Ubuntu to paste.
Notepad++
This program can clean up unneeded/excess HTML and other code surrounding text. Additionally, it has a cool lizard icon as its logo. You can go download a free copy from their download page.

Getting Ubuntu Set-up with Tools
Installing Ubuntu
Run Windows PowerShell as admin
Enable-WindowsOptionalFeature -Online -FeatureName Microsoft-Windows-Subsystem-Linux
Open the MS Store
Search for Linux
Install Ubuntu and Run it
Setup your Linux account via the terminal (Ubuntu)
Make a websites folder:
- cd ~
- mkdir websites
Installing tools
Install Git
Run the following command in Ubuntu to install Git:
sudo apt-get install git
Verify Git is now installed by running this command:
git --version
Verify CURL Installation
CURL is a command line tool to copy data from another server. You already likely have it installed. To verify its installation run this command:
curl --version
If the curl version command above fails you will need to install CURL. Run the following commands:
sudo apt install curl
curl --version
Install PHP
Run the following command and this will update all packages tracked.
sudo apt-get update
Now, to specifically install PHP and its required components run the following commands:
sudo apt-get update
sudo apt -y install software-properties-common
sudo add-apt-repository ppa:ondrej/php
sudo apt-get update
sudo apt-get install php7.4 php7.4-cli php7.4-mbstring unzip php7.4-gd php7.4-xml php7.4-curl
Run the following command to verify that you have successfully installed PHP
php --version
If the above PHP install fails, run this:
sudo apt-get --fix-missing
Install Composer
To install Composer run the following commands:
curl -sS https://getcomposer.org/installer -o composer-setup.php
sudo php composer-setup.php --install-dir=/usr/local/bin --filename=composer
To verify Composer run the following command:
composer --version
Install Terminus
curl -O https://raw.githubusercontent.com/pantheon-systems/terminus-installer/master/builds/installer.phar && php installer.phar install
Now that you have copied the Terminus files and installed them, you need to tell Ubuntu that you have installed it. You do this by giving it an "alias" in its .bashrc file. So, to add alias for Terminus execute the following commands in the terminal. Each must be followed by and "Enter".
cd ~
vim .bashrc
i (no need to press Enter)
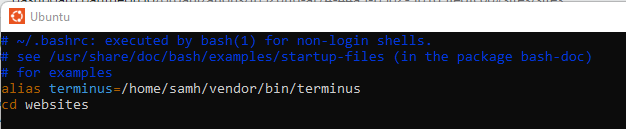
Add the following line to the top of the file under the first lines of comments
Make sure to change the Linux username to your username. In this case "samh" is my linux username. Replace this with your username.
alias terminus=/home/samh/vendor/bin/terminus
 ***check to see if your terminus is actually in this spot with file explorer... you may not have a /vendor or /bin.
Press "Esc"
:wq
Reload the terminal
Either close and reopen or enter
cd ~
source .bashrc
Verify Terminus is working
terminus -v
Show Git Branch
When you are working with Git it is very helpful to have the branch you are working on display on the Ubuntu command line. To enable this your need to run these command in your Linux terminal (Ubuntu):
cd ~
vim .bashrc
i (no need to press Enter)
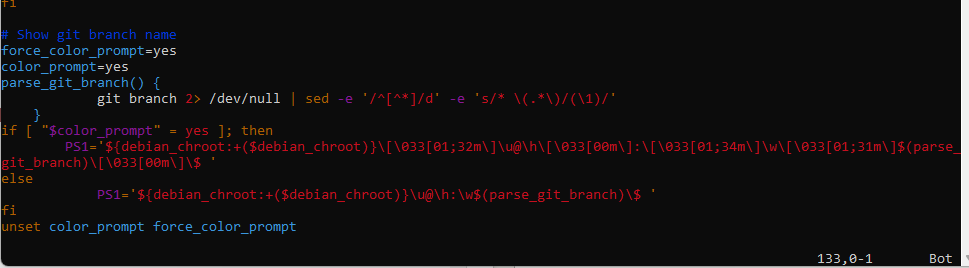
at the end of the file (down arrow to get there) paste:
# Show git branch name
force_color_prompt=yes
color_prompt=yes
parse_git_branch() {
git branch 2> /dev/null | sed -e '/^[^*]/d' -e 's/* \(.*\)/(\1)/'
}
if [ "$color_prompt" = yes ]; then
PS1='${debian_chroot:+($debian_chroot)}\[\033[01;32m\]\u@\h\[\033[00m\]:\[\033[01;34m\]\w\[\033[01;31m\]$(parse_git_branch)\[\033[00m\]\$ '
else
PS1='${debian_chroot:+($debian_chroot)}\u@\h:\w$(parse_git_branch)\$ '
fi
unset color_prompt force_color_prompt
Press Esc
:wq
WSL 1 to WSL 2 Upgrade Process and Website Folder Creation (by Dan)
***if you are already running WSL2 (you will see), skip steps 12-20.
- Click on the Search icon in your Windows tray
- Search for Turn Windows Features On or Off
- Click OK to run as Admin
- Place a check next to Hyper V
* if you are using Windows 11 I found these steps helpful https://beebom.com/how-enable-hyper-v-windows-11-home/ - no need to go past the section on setting up hyper v
* for Windows 10 Home, try this https://www.itechtics.com/enable-hyper-v-windows-10-home/ - Ensure
- Click OK
- Open PowerShell as admin
- Run this:
-
dism.exe /online /enable-feature /featurename:VirtualMachinePlatform /all /norestart
-
- Reboot, I'll wait for you
- After rebooting, open PowerShell as admin
- Enter wsl -l -v
***if you are running wsl2 already skip to step 21*** - You should see Ubuntu listed as WSL 1
- Enter wsl --set-version Ubuntu 2
* If you encounter "WSL 2 requires an update to its kernel component." See Step 4 here https://docs.microsoft.com/en-us/windows/wsl/install-manual#step-4---download-the-linux-kernel-update-package
* Ubuntu might have a slightly different name on your computer - Wait
- Wait
- Wait
- Seriously, it could take 10-20 minutes
- Verify the swap was successful by entering wsl -l -v
- Once done, close PowerShell
- Reboot
- Open Ubuntu
- cd ~
- cd /etc/
- sudo vim wsl.conf
- i
- Add this to the file (not the 1. though), if generateResolvConf exists, change it to false
- [automount]
enabled = true
options = "metadata"
mountFsTab = false
[network]
generateResolvConf=false
- [automount]
- esc
- :wq
- sudo rm -rf resolv.conf
- sudo touch resolv.conf
- sudo vim resolv.conf
- i
- Add this to the file (not the 1. though)
- nameserver 8.8.8.8
nameserver 8.8.8.4
nameserver 8.8.4.4 - Not for the file, just a note about our VPN and WSL2. I've hit blockages while on VPN and had to add other nameservers. If you are able to pull down repositories while off and on the VPN, ignore this. If not, let Dan know.
- nameserver 8.8.8.8
- esc
- :wq
- sudo chattr -f +i resolv.conf
- cd ~
- source .bashrc
- cd ~
- cd <your websites folder>
- clone a site
- If you get an error such as "Permission denied (publickey). fatal: Could not read from remote repository.", then go down to the sections "Connecting to Pantheon with Ubuntu" and "Build Trust Between Your Computer and Pantheon" and complete those first, then attempt to clone a site again and resume the steps.
- Open bash
- cd ~
- vim .bashrc
- i
- locate the line that begins with cd
- Make sure it says cd <your websites folder name>
- Mine is just websites, so it looks like cd websites
- esc
- :wq
- source .bashrc
- Verify that it works
- You should have been placed in your websites folder
Checking Terminus
- Open your bash
- Your path/command should be something like ~/websites$
- terminus --version
- Should be 3.something
- terminus drush samhales.dev -- cc
- Exit 0 means success
Visual Studio Code
VS works well with WSL2 and does everything we need. Here is what Visual Studio says about itself,
"Learning to code is intimidating, so set yourself up for success with a tool built for you. Visual Studio Code is a free coding editor that helps you start coding quickly. Use it to code in any programming language, without switching editors. Visual Studio Code has support for many languages, including Python, Java, C++, JavaScript, and more. Ready to get started? Check out these introductory videos or check out our coding packs for Java, Python, and .NET."
Install it from here, https://code.visualstudio.com/
Once you have downloaded and installed VS please add these extensions.
- Extensions
- Easy Less
- Symfony Code Snippets
- Drupal Smart Snippets
- drupal-check
- Beautify css/sass/scss/less
- Remote WSL
- PHP Extension Pack
- phpfmt
- File mappings (I don't understand)
- .theme to PHP
- .module to PHP
We can still create workspaces for each set of folders so you can group your projects together. That's done like so:
- Open VS Code
- Select File
- Select Open Folder
- Navigate to your folder
- WSL 2 would be \\wsl$\Ubuntu\home\<user name>\<websites folder name>
- Click OK
- Voila
- Now select File
- Save Workspace As
- Enter a name
- Click Save
- Once the workplace is set up, close VS Code
- Open bash (close and reopen if already open)
- CD into your website folder, the one that you navigated to in step 4
- code .
- VS code will open and make the connection to WSL
- From then on, the quickest way to open the workspace is either
- opening VS Code through Windows and selecting a recent location
- or opening the parent folder in bash and typing code .
- Any valid WSL enabled folder will look like this in File >Open ecent
- /home/<user name>/<folder name> [WSL: Ubuntu]
- From then on, the quickest way to open the workspace is either
- In VS Code, click on Extensions
- Scroll through your enabled list and look for any that have an Enable in WSL button
- Click on Enable in WSL for each
- You may need to restart VS Code
Starting Ubuntu in your Web Development Folder
To set Ubuntu so it starts up in your web development folder follow these steps. Once you have created these two folders run the following commands:
cd ~
source .bashrc
To choose the start folder, add this line to the top of the .bashrc file as shown below
cd websites
Press Esc
:wq
Close/reopen your Linux terminal
Verify you started in the new location. When you open Ubuntu and type ls you should see the "websites" folder
Installing Ahoy
In Ubuntu enter the following commands:
sudo wget -q https://github.com/ahoy-cli/ahoy/releases/download/2.0.0/ahoy-bin-`uname -s`-amd64 -O /usr/local/bin/ahoy && sudo chown $USER /usr/local/bin/ahoy && chmod +x /usr/local/bin/ahoy
ahoy --version
When all has gone well you will see version 2.0.0
Connecting to Pantheon with Ubuntu
This section of the set up enables you to connect to Pantheon hosted sites using Ubuntu. If you do not yet have a Pantheon account skip this set-up. Without that account you cannot connect with Pantheon. We will give you the account when it is time.
The first step in connecting with Pantheon is to generate a key for Terminus auth. Go to https://dashboard.pantheon.io/users/#account/tokens/
Login if necessary
Create your token
Enter a token name
Copy the Terminus command and run it in your terminal
terminus auth:login --email=<email> --machine-token=<machine_token>
Test out a Terminus command like cc all on a site. In an open Linux terminal (Ubuntu) enter:
terminus drush <site name>.<env> -- cache:rebuild
You should see a success message and Exit: 0
You are now connected to Pantheon via Terminus. Well done.
Build Trust Between Your Computer and Pantheon
Now that you are set up with Ubuntu talking with Pantheon, let us take the steps so you can build trust between your machine and Pantheon so you will not longer have to enter your Pantheon password to keep giving commands to Pantheon. So, open your terminal (Ubuntu) and enter these commands:
cd ~
ssh-keygen
- Keep the default name and location (hit enter)
- No passphrase
cat ~/.ssh/id_rsa.pub
Copy all the content of the file
S
eval 'ssh-agent'
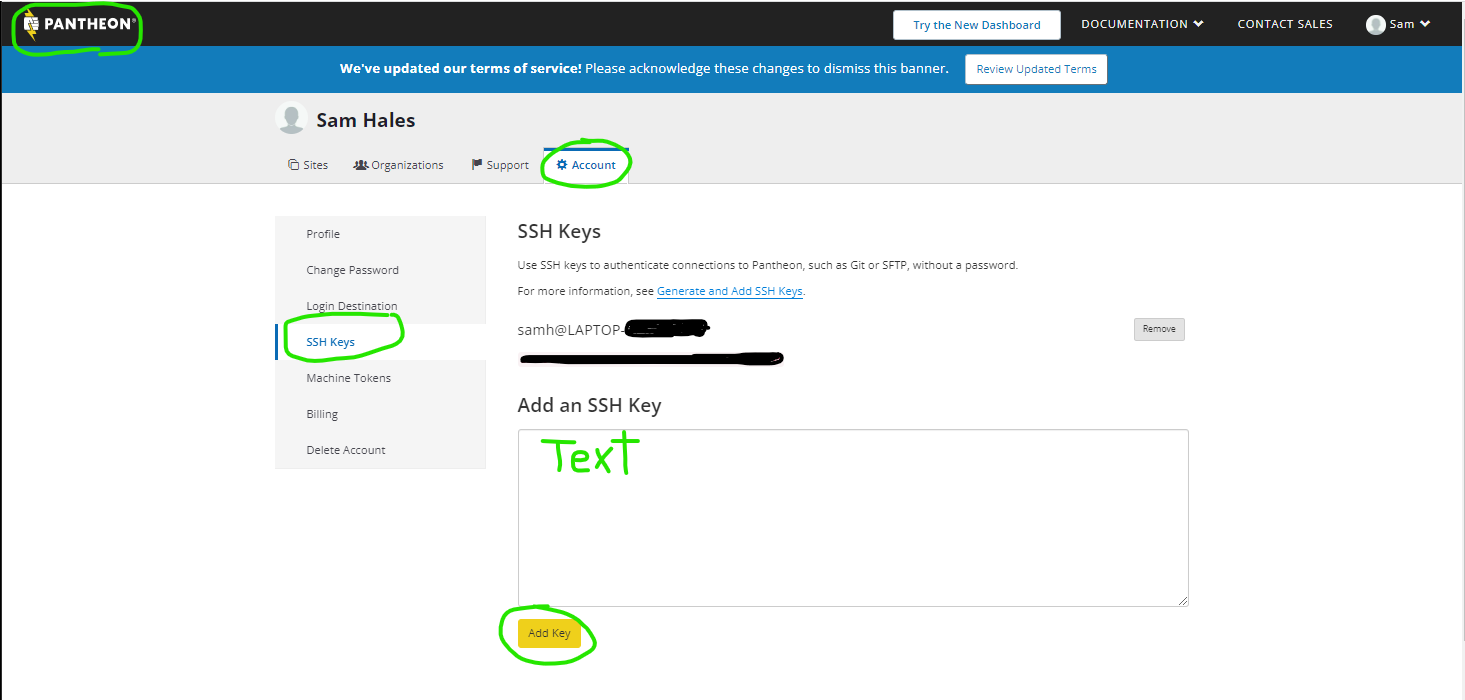
Go to your Pantheon dashboard, https://dashboard.pantheon.io
Select "Account"
Select "SSH Keys"
Paste the text copied from above into Add an SSH key
Click "Add Key"
Close/reopen your Linux terminal
Run a terminus command on a Drupal 8 site terminus drush <site name>.<env> -- cr
Connecting to GitLab
Go to gitlab.com and make an account. Tell Sam your username and he will get someone to send you an invite to the WaTech Web group. Look out for an email! Follow the instruction on the email to get access to the WaTech repositories.
If you haven't done so already follow these instructions for the ssh key.
Open your bash
- cd ~
- cat ~/.ssh/id_rsa.pub
- If, and only if it does not exist:
- ssh-keygen
- press Enter a bunch of times
- Then, cat ~/.ssh/id_rsa.pub
- Copy the code printed out, all the way from ssh to your ID at the end
- Open https://gitlab.com/-/profile/keys
- Paste in the RSA data
- Enter a name for the key (doesn't matter what really)
- Leave the date empty
- Click Add key
To connect to GitLab:
- Open https://gitlab.com/-/profile/personal_access_tokens
- Create a new token, name it what you want
- Leave the date empty
- Give it read_api access
- Click Create personal access token
- Copy the token at the top
- In the terminal run: composer config --global --auth gitlab-token.gitlab.com [your_token]